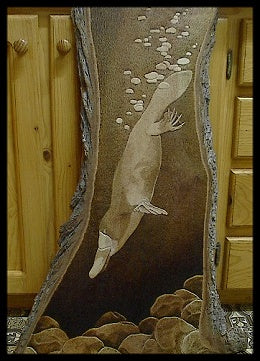
'Platypus Diving' was conceived because I bought a lovely whopping big natural slab of Grevillea robusta at a wood show and had been musing for some time about what to burn on it.
Some time ago I bought/gathered as many samples of wood I could and did comparison burns on each type to see what effect I got. These experiments showed me that Silky Oak (it's common name) had an unusual characteristic when burnt. It's odd, end grain (similar to Needle wood in a way) gave the burn a slightly muted, stippled look as some of the grain picked up the burn heavily, and others didn't. This I thought would be perfect for water images or a soft focused/romantic look. I have 5 other images in my head already for use on Silky Oak in the future, but platypus won out for the first to be tried.
EXPERIMENTING
Just mentioning my experiments on wood has brought something to mind, something I think is a really valuable lesson in pyrographics; to learn to think outside of that box we've all been taught to live in. I know, I know, I've said it more than once, but I firmly believe that playing with your medium and trying all sorts of wacky ideas only helps you to learn more about your chosen craft. It also helps you discover some pleasant surprises along the way. Grevillea was one such surprise. Only by comparing woods did I start forming ideas about what would best suit this wood. Once I discovered that, it was a matter of matching the best subject to it...of marrying them.
MARRIAGE
I'll use this term a lot in my writing and I'm sorry in advance if I seem to harp on it. But the 'marriage' of certain things in a picture can take it from being a good piece, to a great piece. It creates a subtle harmony in the picture where everything works together and not one thing looks out of place. It's very hard to look at a piece and put your finger on Why it works, but when it does, you'll be sure all the elements will be working with each other, not against.
I could burn Platypus on anything really, but the effect of burning on Silky Oak perfectly lent itself to a water piece. First important marriage: the right subject matter on the right surface...they were meant to be together. Second important marriage: the depth of the wood and the wide bottom suggested to me something mysterious...something 'hidden'...perfect for the bottom of a river bed. Third important marriage: using the right burning technique. Things under water are not sharp. They have a dream like quality and it was important that the burning technique reflect this, so I tended to use a flat shader for most of the work. I actually only used 3 nibs for the whole piece. A round shader, a writing nib and a heavy duty skew to make the cut stops.
There are other elements of marriage in 'platypus diving' but these first three were the main considerations. I'll cover some more as we go along.
SUGGESTION
I guess what I'm trying to suggest is to not always think in terms of one type of wood, one type of burning method. Think about broadening your 'canvas' if you are getting a little stale in your work, or if you'd like to see what else pyrography has to offer.
Silky Oak is an Australian native wood, but the same principle applies to pyrographers wherever they live. We all have native and exotic woods that we can try. Some may be horrible when tried, some may be wonderful.
SAFETY
I do want to point out the issue of safety when talking about experimenting in your pyrography. We do use a hot implement to scorch/burn a surface and we have to keep in mind that surface needs to be free of anything that can become toxic when heated. There are a few woods I know of that can cause some respirotry aggravation to a small percentage of people. Cedar and Yew are two of these woods. I personally don't have any trouble with Cedar, but have heard from a few people who have. The main thing is, if you are burning a wood and start feeling some irritation, STOP. It's not worth it.
It's also important not to burn on MDF and other treated/prepared woods. Also don't burn on woods that have already been finished. And please be careful about burning on pigments that contain metals and other harmful chemicals. If you want to burn on pigments, such as pencil (oil and otherwise), pastel, paints or inks, please try to find out what they contain. At the least watch out for any containing arsenic, leads and other metals and chemicals.MSDS SHEETSmay be able to help you find out the contents of the pigment. If not, try contacting the manufacturer.
BORING STUFF FINISHED
Okay, now the boring chat is out of the way we can have a closer look at the making of 'Platypus Diving'. This article is heavy in graphics so I haven't put the larger images of Platypus on this newsletter. I have however included links at the bottom in case you would like a look.
At each wood show I do I like to take a walk around when time allows to search for interesting wood. At last years Melbourne wood show I saw a lovely slab of Grevillea robusta. Silky Oak, as it's commonly called, is an Australian native tree of conical shape, fern like leaves and striking yellow comb flowers. It's timber is medium/hard and the grain is cell like, rather like needle wood. The slab has a natural bark edge and was approx 2.5 meters in length. The cost was just $30 but it needed plenty of sanding before use.
SELECTION
The preparation was relatively straight forward. The hardest decision was what part of the slab I was going to use and how long it should be. I had already determined my first piece was to be a platypus diving to the bottom of a river/stream, but it was important that just the right part of the wood was chosen. the bottom tapered out beautifully and seemed just right to house the rocks, with a suggestion that more lay beyond what the eye can see. I thought the thicker bark in this area would also marry (yep, that word again:) with the bulk formation of rocks, giving them the feeling of almost flowing beyond their limited space and not feeling 'contained' within a frame.
I wasn't bothered if Platypus felt contained within his surroundings as it suited the feeling I was going for to have him almost appear as though he was swimming down a shaft of light and water to the mysteries down below. Mind you, the bark colour doesn't stand out at all compared to the burning. They almost appear as the same colour so there is also a nice marriage (I did warn you:) of colour and tone between the burnt heart wood and the natural frame.
CUTTING & SANDING
I next ruled off the bottom of the wood to level it up, but also to remove a little excess I didn't need for my composition. I wanted platypus to be full scale and also allow for plenty of depth for him to swim in, for rocks and for a trail of air bubbles. I researched the length of platypus and then very roughly drew in basic lines representing the rock profile, the platypus and the gap above him. I adjusted this one because I felt the distance between his bill and the rocks wasn't enough. I then marked the top of where I thought my picture would end and measured 3 times from my bottom line to make sure the top would be absolutely square with the bottom. I think, unless planned, a piece of wood that isn't square can totally throw the eye off and is distracting to the picture.
Next I cut the slab at the marked lines with a circular saw set at square. Sanding then took place using a electric sander and good old elbow grease for final, finishing at 200. Normally I would have finished at a 400 grit but I had some carving to do which would need further sanding, so thought it best not to go overboard.
For my work it's important to me to learn something about the subject. I'm going to try and make platypus come to life, so I want to know why he's there, what his habits are and to generally get a feel for him. To do this I topped up my usual Aussie platypus knowledge by surfing the net, hitting the books and looking at a documentary.
THE SUBJECT
I'm sure most all of you know something of this unusual Australian mammal but for those international pyro's who don't know, here's a little run down.
The Platypus is a mammal, yet it lays eggs. (These rare mammals are called 'monotremes' and there are only 3 in the world, 2 in Australia and one in New Guinea.) It's well known features are it's beaver type tail, thick water proof fur, webbed feet and it's duck type bill. (We tend not to call them 'duck billed platypus' here in Australia because there is only one kind of platypus. There are no 'billless' species.) The male is also featured by having a spur on his hind leg. (By all reports, a jab from this spur is incredibly painful.) The female is smaller than the male, the male being around 55cm. They live in burrows dug into the side of creeks or rivers and feed mainly on invertebrates but also catch small fish and amphibians found in the water. They are most active at dusk and dawn. After mating the female will lay eggs in a birthing chamber she digs in a burrow. The young will hatch in one or two weeks and stay in the chamber for about 4 months, suckling milk from the mother.
Platypus
VISION
Usually, by the time I approach a picture I have already tumbled it around in my head for quite a while and have a good idea what the finished product will look like, right down to the varnished, finished piece sitting on a wall (or whatever). Then it's just a matter of putting all the pieces together. Well, that's the theory, but it doesn't always work that way. More times than not something has to be altered, but generally speaking, by the time I start, I have a mental template I'm working to.
PATTERNS
I'm aware that most of you work from patterns and I think that's just fine. Honestly I do! Lets face it, in some of the craft I try, I either don't want to be spending the time working up my own patterns or I simply have no idea of how to make patterns for what I'm doing! I was dabbling in lead lighting a little while back and I had absolutely no desire to make patterns when there were perfectly lovely patterns to be had. I wanted to roll up my sleeves and get my hands busy, not wrack my brain about patterns and design. Using patterns is a standard practice in ANY craft I can think of, so if you use patterns, don't be brow beaten into thinking it's not right. Sure, it's great if you want to go for something original and that should be encouraged, but there is no shame in just wanting to get right down to the burning if that's what you want. What I'm describing here is not how I believe all pyrography should be done, it is simply describing how I go through the process with a signature piece. I don't want you to think I would expect this of you.
REFERENCE
Right, it's time to put pencil to wood now. As I said, I already have the picture in my head and now it's a matter of taking a 2B and doing a basic sketch. No...I don't have a photographic memory. Like most wildlife artists, I use various sources of reference to make a composition. I had various pictures of under water shots to see how light and bubbles looked. I had my own pictures of platypus and supplemented these with several others so I could study flippers, bills and the like up close. I looked at other pictures of rocks, both on the land and in the water. Once all this material was gathered I did very basic markings of the main players in the piece, the rocks area, platypus and bubbles. I also drew lines to indicate where I wanted the light source to come from. It was very important that this was kept in mind during it progress.
SKETCHING UP
Once I was satisfied with the basic composition, I freehand sketched the Platypus (first), the bubbles(third) and the rocks (second), looking at various reference to give me an idea of anatomy, rock form and bubble dispersal. The rocks and bubbles were by far the easiest. That was simply a matter of getting a feel of patterns and then sketching in both as I envisaged them. The platypus took me an age to get right and was reworked several times before I was fairly happy with his proportions. Mind you, I'm still not happy with him in retrospect. I think the head's too big and the tail too short and I over sized him a little, but that's the way it goes. Something to improve on for the next time.
The pencil I used was a 2B and it's worth noting that constantly standing back from a large picture like this is a must to help you gain overall perspective as you draw.
Let me start this stage by confessing I'm not a carver and have never carved before. When I do a signature piece, I want to push myself. It's no point to me to do another picture in a technique or subject matter that I've already explored. It is important that I do something that pushes my boundaries, both technically and creatively. I essentially do this for 2 reasons: 1) It's the best way I know to learn more and increase my technical repertoire. 2) I just love a challenge and to try something new. It keeps me focused and excited.
I decided to incorporate relief carving into 'platypus diving' because I have been thinking carving and pyrography on the flat might look special together. There's no doubt that you can get a high degree of 3D effect with burning alone, but because this piece was being done on a wood that doesn't allow sharp detail and because all the edges are round, I though this was a good time to try it.
BEFORE STARTING
Before I committed myself to carving and burning, I first took a spare piece of Silky oak and did some experiments on it. I burnt using a few techniques to see what effects and colour I could expect, what nibs would be best to use and what was the deepest tone I could get. I also experimented using a heavy duty skew as a blade to do stop cuts. I then carved the timber with few small, sharp chisels to see if I wasn't getting in over my head. I also used tested 3 finishes on the wood to see what effect the varnish would have on the finished piece; polyurethane, Danish oil and water based acrylic varnish. This is important to keep in mind while proceeding because the effect you are going for can be radically changed once the finish is put on. Some of you know exactly what I'm talking about. To save disappointment this is a good practice to get in to if you are unsure how a wood will finish using a particular product.
All the tools were now in place. In this picture you see the drawing more complete. It has been carefully checked and reworked for proportion and anatomy but has not been done in any great detail. I tend to draw the basic outline and outstanding features only and then use the burner free hand to build the whole picture.
STOP CUTTING USING A SKEW
Because I was first going to relief carve the main curves, I needed to do 'stop cuts'. These are the cut marks sunk in to the wood to stop a chisel going further than that point. I knew carving these with a chisel would both test my carving skill and my patients so I decided to do all the stops cuts using a very sharp skew on high heat. This proved more effective than I'd hoped and estimate all stop cuts took only 40 mins. You can see me here relief carving up to the stop cuts around the bubbles. The skew proved very good on tight turns like this. (A skew is a term used for a nib that is knife like.) The idea is to remove wood from the outside of the cut line, to allow the object to stand proud from its surrounds.
The bubbles have all been stop cut and now it's the turn of the rocks. This part was actually a lot of fun. I did have to use a burner that had a good, strong high heat because this wood was quite dense. Note the overlap of the rocks. Here I am following the outer lines of them only, but you can see how I've drawn the front rocks first, the only rocks appearing whole. The rest are partially covered as they recede into the background.
CLEAN AND SHARP
It was clear from the start of doing the stop cuts that it was going to be essential to keep the blade sharp and the nib clean. If I didn't, the drag slowed down the burning, resulting in a messy burn and a shallow depth...and added stress on the nib resulting in a risk of damage. A 'skew' nib is just like a little hot blade. Just like any blade it works best if you keep it sharp and clean. Burning the Silky Oak at high heat certainly created a lot of carbon and muck on the blade, so I was constantly using the edge of a snap blade to kick any crud off.
I think you can get a better idea of the simplicity of the pencil drawing in this picture.
Here you can see me stop cutting the platypus itself. I'm using an Australian variable temperature burner called an Ironcore. I started out on this piece using a North American burner but I soon found it didn't have quite enough oomph to take on such an extensive and heavy burn on Australian hard woods.
THE NIBS
I make a series of nibs for the Ironcore and other wire nib burners. They are based on the 4 nibs I use for all of my work and are: a round shader, a square shader, a skew and a writing nib. For this piece I only used 3 nibs, the round shader, the skew and the writer. I actually used the round shader for around 80% of the project. To me the round shader is an essential nib in just about all work I do. I prefer a round shader to a square because they have no straight edges. This helps prevent patchiness caused by overlapping lines if you want to burn large areas or do subtle tone. You can also use it's toe to burn soft lines and shading.
SIMPLE LINES
The stop cuts are all following simple lines. It's not necessary to be too complex with this. I just want to outline the main portions of each object so I can remove the wood around it by relief carving. You can see at the bottom I've carved around the rocks already. I wasn't concerned that doing the stop cuts by burning would 'muddy' the edges because by the time I caved and sanded, most burning would be removed...what wasn't would soon be covered up by the main picture burning.
To emphasize the relief carving I've taken this picture by the light of a lamp at an angle. The bubbles were by far the hardest part to carve, being so small and fussy....the platypus body was the easiest. I've actually still yet to do the carving on the flippers, which I had totally forgotten about for some reason.
After I completed all the stop cuts, I used a chisel to do a shallow relief carve around the outside of the lines. I then took off all the sharp edges on the objects with a chisel to give them a roundness. It took many, many hours of carving everything as smooth as I could before starting the hand sanding. This also took quite a bit of time but is necessary to give the surface a nice smooth finish to burn on. I finished using a 400 grit paper.
You'll see that I have burnt a patch just under the platypus. I did this to lay one of the darkest tones I will need. That way I can use this patch to compare extremes of light and dark. Normally I'll do this by burning something dark on an animal first off, generally the dark of the eye, but in this case the darkest parts were to be in the depths of water, not on the animal. Once this dark tone is laid, I know everything on the platypus/rocks/bubbles will be lighter than this patch.
It may not look it, but the water is going to be one of the hardest of any part of this picture. I expected this and wasn't disappointed...it was a cow to burn!
LAYERING
To give the illusion of this space being water and not just a hunk of black, I was going to have to burn very subtle graduations of tone. For me this can't be done all at once. I like to build and rebuild gradual tone in layers to give it a smoothness, so this patch of water took a long time to burn. This brought up three problems though: 1) It's sometimes difficult to burn on burnt areas and keep a fluid smoothness, so I was fighting that all the way. 2)A few parts of the heart wood were still slightly too moist and the heavy burning was releasing gum. This gum would sit/stick on the work and then, given time, it would oxidize, forming a chalk like appearance on the work. I could wipe this off with spirits but it would soon form again. I gambled that this wouldn't be a problem once the varnish was applied. Luckily this was the case. 3) Despite what a lot of people think, I am not gifted with an abundance of patients so I was going slightly insane as I applied layer upon layer of water. I had to break up the work by going on to other things to combat this.
MISTAKE
You can see here that I have started the water closest to the rocks were it is at it's darkest. I wanted to create a shaft of light feel so also added quite a bit of dark to the top left corner. This was too heavy by far and a mistake when considering my light source so later I was to lighten this mistake by a fine scraping with the side of a blade. (Compare this picture with later ones where I have lightened this area.)
I got to the stage where I was losing perspective because all I had been doing was burning water. It was time to ease the boredom and also start getting a feel for how I was going to do the rocks and how they would feel next to the darkness of the water.
ROCKS STARTED
Here I have started to burn the basic tone of the rock without going into any detail of texture or shape. You can see the middle rocks are darker. I want them to both feel like they are more distant and also that the platypus is preventing the same light getting to them. The lightness on the edges of the rocks is due to the edge curve of the relief carving and has not been burnt yet. I will selectively burn the edges depending on my light source. IE: The parts of the rock that are in direct light will be light and the parts away from direct light will be darker.
I've kept going back to the water during this stage. If you compare this picture to STEP 7, you will see the water has been added to and has a smoother appearance.
Note I've done a little burning on the platypus bill. This is done for very much the same reason as starting the rocks. I needed to get a feeling for how the tones of the platypus stack up against the other elements.
SHAPING THE ROCKS, STARTING THE PLATYPUS, WATER GOES ON, AND ON, AND ON, AND...
FLIPPERS AND FUR
I had been dying to start on the platypus by this stage so started mapping out the basic tone I was going for. Much like with the rocks, I'm not going for any detail at this stage, I'm simply burning in the darkest areas. You can probably see that I've now carved the flippers. I totally forget this before so have done that and also burnt the really dark parts between his 'toes' on the hind flipper. This is the darkest part of the whole platypus and will give me something to compare the other burning against.
ROCK SHAPES
Once I had laid in the basic tone of the rocks I could then start to texture and form them. All of this area was done without referring back to reference. I decided to have it develop naturally and free handed each rock, putting in shadow and light and edges where I thought or felt they should be. In some ways this was the most freeing, fun part of the piece, in other ways it was time consuming and a little frustrating. Sometimes the rocks weren't working and I soon learned to leave them when this happened and to approach it afresh...otherwise it was becoming a muddle. It was also really essential to keep walking well back from the rocks and having a look at a distance so I could judge how they were working as a whole and not just as individual shapes.
AUSTRALIAN WATER TORTURE
I think you get the idea that I kept working the water over and over. I know it seems like a lot of work, but the water was the most essential element of the whole piece. It looked so simple, yet if I could make it believable then it didn't matter how well I did anything else, it would look like they were suspended in space, not floating in water. You can also see that I've scraped back that part I wasn't happy with.
You can see quite a bit of work continues on the platypus here. I'm trying to do several things here as I work. Even though platypus appear to be a lump of fur, they do have subtle indications of muscle structure, so it was important I just didn't blob on dark and light without keeping this structure in mind. (It took a lot of close observation and visualizing how they must move.) I'm also trying hard to see how the bubbles and light would play on the fur. Lastly I'm trying to convey a sense of mystery as the platypus dives into darkness. Perhaps you can see what I'm trying to get at as you compare this picture with the previous one. The tone on the body in step 10 is flat compared to this one.
BILL AND BUBBLES
Just as I had done in previous steps, I felt it was now time to bring the bubbles into the picture. I have just done a tiny bit of work on them, adding shade to a couple to get a feel of the contrast. I was also getting a bit worried about the bubbles by this time. I was feeling reasonably confident this piece wasn't going to be a failure but it now hinged on the bubbles. If I cold bring them to life and have them seeming as though they were floating free of the picture, it would make the water come alive and also convince the viewer of the sun above and the depths the platypus was diving. It would also be the main thing to convey movement, so much was riding on the bubbles and I was getting a little nervy I wasn't going to be able to burn them effectively. Doing a few of them put my mind at ease. Note also I am starting to add their shadow to the coat of the platypus, another good indication to the viewer of where the light is coming from.
The bill has been more extensively worked here. It was actually very difficult to do and I found myself adjusting it several time. I suppose it's because I knew this was probably the most important part of the animal and I wanted to get it just right. It was difficult because it's a lighter part of the animal compared to the dark parts of the coat and the surroundings, But it's also deeper into the creek than anything else so it needed to appear more 'gloomy'. It was a hard balance to strike.
ROCKS
Like the water, the rocks were starting to push me over the fine line of insanity, so I kept chipping away at them in fits and starts. Here I've created more shape and form, created more depth and started to darken some edges.
There's not much to tell in this picture. You can compare it for yourself to the previous and see that I have basically continued to add more of everything.
The bubbles have now been worked on, the rocks have been built up more and the coat of the platypus has been constantly added to, especially towards his back half.
I felt it was lacking something. I wanted to have something more to indicate movement. Then it struck me that there would be little pocket of air trapped in his coat and decided to put a tiny trail of mini bubbles coming from his coat. I didn't want to over do this, even though it was really tempting, they looked really effective to my eye and were a subtle, yet effective addition.
Well, it sure was a long journey but an enjoyable one. (Apart from the water and rocks of course. Did I mention they frustrated me??) I had one final thing to do, the thing that can make a pyrographer a little edgy. I had decided that I was going to use polyurethane varnish before I even put the first pencil line down. Now the time had come to slap it on, I got a little nervous! I was happy with the play of light and the starkness of the bubbles and the definition in the platypus coat. By default I knew I was going to lose some of that using poly varnish. I was going to yellow the wood and that would take away some contrast and detail. But the platypus in my mind is swimming in that tannin water you get in mountain streams and there is a glow and a murkiness to that water. I really wanted that glow to bring the piece to life and to further marry it together.
Which was the right way to go? Well...the jury is still out, but I'm happy with my decision. I felt an acrylic would have left it looking blond and somewhat washed out. I did lose some detail but the glow and shimmering effect more than make up for it. The piece was originally meant to be a study of light and dark anyway and I think it's met it's objective in that regard. You can compare the two for yourself below and also have a look at the bigger pictures by clicking the link at the end of this article.
All in all I'm happy. As usual I would do a few things differently, but that's the beauty of doing something like this. You get to think out of the square, have some success, some failure and learn an awful lot along the way. I think that's where we came in...and a good time to go out. Thanks for reading. I hope you enjoyed the making of Platypus.
Regards, Sue:)
Left, before varnish. Right, after varnish.
Copyright Sue Walters 2003
No part of this newsletter can be reproduced without the expresses permission of Sue Walters
choosing a selection results in a full page refresh