CD/PDF Pyrography Lesson Kits Now Available
.
Chickadee and Pine - Kit#2:This familiar backyard scene is a favourite of bird lovers everywhere. All the nuances of portraying a soft, delicate songbird are explored. The pine cone and needle setting plays an intricate part of this pattern as well and is defined with the same detailed clarity as the main subject...creating a fully rounded portrait of the quintessential songbird in nature.
.
.
.
Peregrine Falcon - Kit#1: This dynamic portrait study brings to life the stark beauty and stateliness of the majestic bird of prey. The intensity portrayed in the eyes truly reflects the silent, strong nature of these regal birds. Photographed demonstrations illustrate how to create realistic feather formations using specific shading and highlighting techniques.
.
.
.
Chipmunk On Rock- Kit#3:)The chipmunk is that cute and whimsical creature we so often find paying a visit to our quiet walks in nature. Here we find him perched on a moss covered rock with the day’s lunch in his delicate hands. This lesson will explore methods of fine fur texturing that will make this little fellow appear a mere touch away. Full description will also be given to burning a highly realistic rock, moss and foliage setting to complete the image in its entirety.
.
.
.
Loon On Water - Kit#4:Nothing personifies the tranquil solitude of the wilderness more than the sight and sound of the common loon on water. He is a lone spirit of the placid lakes, his body carving a gentle rippling path through the water. This study will provide a lesson in burning this distinctive bird in it’s natural habitat...upon rhythmic waves...his soft reflection adding that extra touch to bring this peaceful scene to life.
.
.
___________________________________________
.
Relief Carving With A Skew
| A skew is the nib in your kit that burns a crisp line....it's designed to cut the surface of the wood as it burns. They come in various shapes but the one thing they all have in common is they all have a sharp, knife like edge. |
 An example of a Skew Nib. Heavy duty Skew is best.
|
| I started experimenting with using a skew when I decided to add some relief carving to Platypus Diving...a large project I burnt on a natural slab of Silky Oak. I confess, at the time I only had a kiddie set of carving knives that Mum had passed on to me. I wasn't looking forward to cutting the stop cuts on such a large project, with such poor knives, in a fairly tough timber. (In this case a stop cut is the vertical cut line that follows the design in the areas where a non carved and to be carved area meet. It defines the edge of the design to be left in relief, but it also creates a 'moat' between the design and the area to be carved away. When removing wood this moat prevents the carving tool from accidently gouging the area to be left un-carved. It 'stops the cut'...hence the term.) |
Seeing I was going to burn the relief carving, I decided to use a skew at high heat to burn my stop cuts. The heat aided in the cutting process, allowing me to sink the nib in deep and quickly without too much pressure. Not only this, but cutting around curves and turning tight corners was a breeze. The high heat burnt a path for the sharp nib to follow. A turn of the burning pen allowed me to easily and neatly follow a curved line. And, because little hand pressure was needed to push the skew, there was less danger of it accidently over shooting a corner.
|
|

Turtle Rising. The 2nd Pyro-Relief Project. Approx. 2 feet across.

Detail Of Turtle Rising
I found that I had to run over the line a few times to reach deep down, but the entire process only took me around 45 minutes all up for Platypus Diving. It did take me slightly longer for Turtle Rising because I wanted to carve a deeper relief on that project,thus needing deeper stop cuts. Once I reached as deep as the nib shaft would allow, I set to carving away the surrounding wood with chisels. Once this was done I would burn the stop cuts again to sink them lower...then re-carve, and so on until I reached the final depth desired.
Instead of writing more now, I will fill you in on the process with the aid of pictures below. All in all I found it an easy, fast and effective technique. I think it's well worth a try. The relief carving added a different dimension to these two projects and there is no doubt that carving marries beautifully with pyrography. Even the most simple project could benefit.
1) First cut. Follow the edge of the design with the skew on high heat. Move smoothly at a pace that will allow the nib to sink in deep.
.
 2) First Gouge. Use a gouge or other carving tool to remove the surrounding timber, up to the stop cut.
.
2) First Gouge. Use a gouge or other carving tool to remove the surrounding timber, up to the stop cut.
.
 3)Second Cut. Because I wanted to carve deeper, I burnt a second level of stop cut. Don't forget to hone your skew nice and sharp.
.
3)Second Cut. Because I wanted to carve deeper, I burnt a second level of stop cut. Don't forget to hone your skew nice and sharp.
.
 4)Second Gouge. Gouging away more wood from around the design after the second stop cut burn.
.
4)Second Gouge. Gouging away more wood from around the design after the second stop cut burn.
.
 6)Third Gouge. Carving away the final layer
.
6)Third Gouge. Carving away the final layer
.
 7)Smoothing. After going as deep as I needed I now use a broad gouge to level up the surface as much as possible before sanding
.
7)Smoothing. After going as deep as I needed I now use a broad gouge to level up the surface as much as possible before sanding
.
 8) Removing the scorched area. I decided to removed the burnt remains with a chisel to give me an even raw surface to burn on.
. 8) Removing the scorched area. I decided to removed the burnt remains with a chisel to give me an even raw surface to burn on.
.
 9)Rounding The Design. The edges of the design are then rounded with a chisel to help it blend naturally into the surrounding wood.
.
9)Rounding The Design. The edges of the design are then rounded with a chisel to help it blend naturally into the surrounding wood.
.
 10)Sanding. After further rounding with a chisel, I sand the area smooth, ready for burning.
.
.
Let's now see how Turtle rising comes to life using the same Pyro-Relief technique.
.
10)Sanding. After further rounding with a chisel, I sand the area smooth, ready for burning.
.
.
Let's now see how Turtle rising comes to life using the same Pyro-Relief technique.
.
 After the stop cuts and before rounding the design.
.
After the stop cuts and before rounding the design.
.
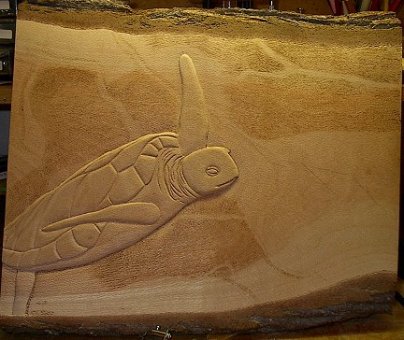 After rounding the design and sanding smooth.
.
After rounding the design and sanding smooth.
.
 The pyrography phase begins.
.
The pyrography phase begins.
.
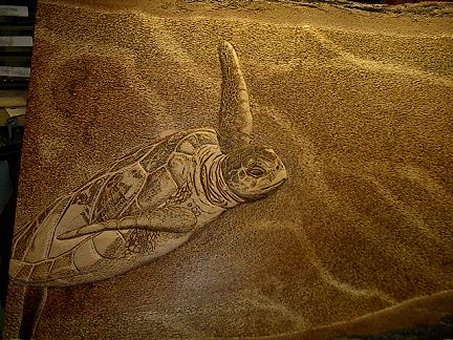
 Turtle is nearly finished but the water still needs to be darkened more.
.
Turtle is nearly finished but the water still needs to be darkened more.
.
 Burning dark shading to the under side of Turtle to emphasize the shadows. This gives the viewer the impression of light coming from above
|